Pumpkin!

My mommy in law sent me a recipe for pumpkin bread and last night I finally managed to make it.

The original recipe called for 3 cups of sugar and white flour. Since Paul is diabetic I switched things around a bit so he could also enjoy it.

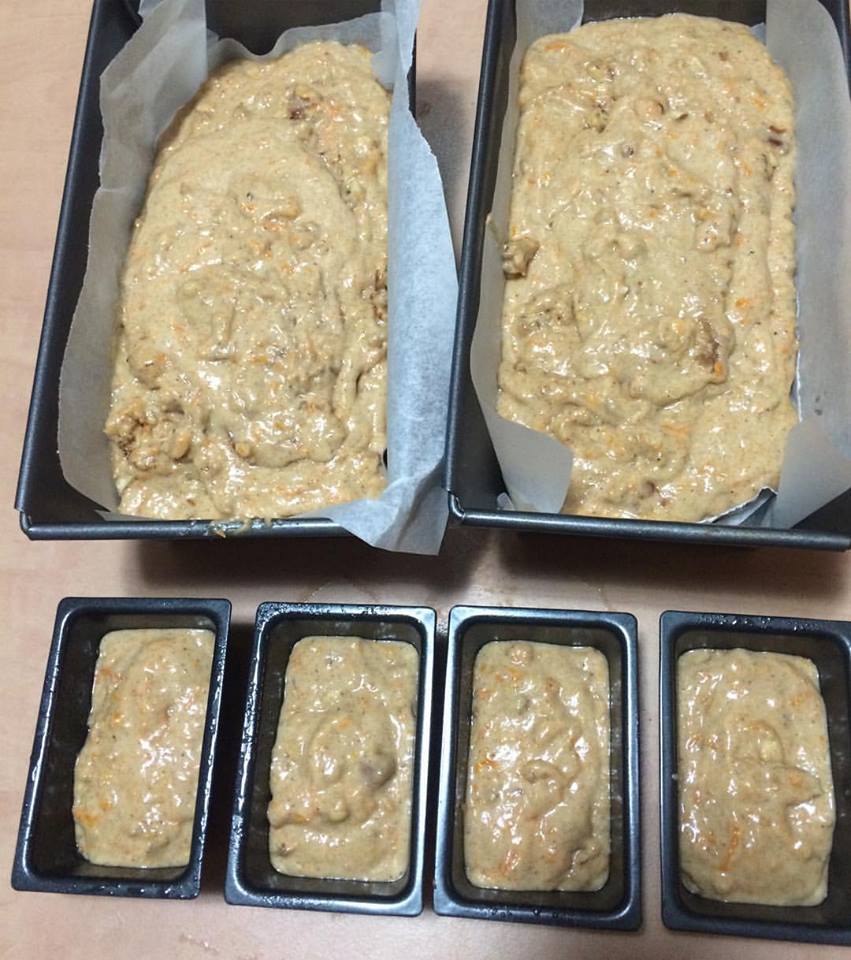
When I started writing up this post I realised that I had only taken a quick picture of the breads before going into the oven.

bread

The loaf I brought to work went so quickly I didn’t have a chance to take a picture either. So I asked Paul to take a quick picture and send it to me.

Why I was surprised when he didn’t just send a quick cell phone pic is beyond me. I know better.

What follows is the gorgeous styled photo shoot he did.

Baked pumpkin bread 

Baked pumpkin bread 

Baked pumpkin bread 

Baked pumpkin bread 

Baked pumpkin bread 

And now for the recipe.

Pumpkin Bread
Yields 2
Yummy, sweet pumpkin bread
Write a review
Print
Prep Time
10 min
Cook Time
1 hr
Total Time
1 hr 10 min
Prep Time
10 min
Cook Time
1 hr
Total Time
1 hr 10 min
Ingredients
  1. 2 cups cooked, mashed pumpkin
  2. 2 cups sugar replacement (original recipe calls for 3 cups sugar)
  3. 1 cup oil
  4. 4 eggs
  5. 2/3 cup water
  6. 1 and 1/3 cup white flour
  7. 2 cups wholewheat flour (original recipe was all white flour)
  8. 1 and 1/2 teaspoons salt
  9. 1 teaspoon nutmeg (I didn't have so I left it out)
  10. 1 teaspoon cinnamon (I didn't actually measure, I just poured a whole lot in)
  11. 2 teaspoons baking soda
  12. 1 cup chopped nuts (I used almonds since that's what I had on hand)
Instructions
  1. Heat your oven to 180C.
  2. Prepare 2 bread tins.
  3. Cook your pumpkin and then drain and mash it.
  4. Add all the ingredients to a large mixing bowl and mix until well combined.
  5. Split the mixture between the 2 tins.
  6. I kept a little back and used my 4 teeny tiny little miniature bread tins, just for fun.
  7. Bake for between 45 minutes to an hour. I stuck with Hilary's suggestion of an hour (I put the mini tins in for the last 20 minutes).
Notes
  1. Enjoy hot out the oven with melted butter.
  2. Its equally as good, cold the next day.
A Bit of This A Bit of That https://gnatj.com/

Whisky: The water of life (and dinner)

I often use wine when I cook. I dont only drink it, I use it in the dishes too.

Many of my chicken dishes use wine, especially when baking the chicken.

A while back I purchased a bottle of Golan Heights Distillery Whisky. Its the first Israeli whisky and I think its pretty decent.

whisky

So I got to thinking, if I can cook with wine why not whisky?

A quick google search showed quite a few whisky chicken recipes so I mashed a few recipes together according to the ingredients I had on hand and O. M. G! I wish the internet allowed you to smell images. This was one of the best roast chickens I have ever made!

Whisky Roasted Chicken
A dark roast chicken, perfect with rice and roast sweet potato
Write a review
Print
Prep Time
10 min
Cook Time
1 hr 30 min
Total Time
1 hr 35 min
Prep Time
10 min
Cook Time
1 hr 30 min
Total Time
1 hr 35 min
Ingredients
  1. 1 large whole chicken
  2. 3 tablespoons whisky
  3. 2 tablespoons lemon juice
  4. 2 tablespoons silan (date syrup), you can use honey too.
  5. 1 teaspoon salt
  6. 1/2 teaspoon ground pepper
  7. 1 teaspoon basil
  8. 1 teaspoon oregano
  9. 1 teaspoon rosemary
  10. 2 cloves garlic, peeled and mashed/diced finely
Instructions
  1. Preheat your oven to 180C.
  2. In a bowl mix the whisky, lemon juice, silan, salt, pepper, herbs and garlic.
  3. You can give them a whizz with a hand blender but I just stirred them with a fork.
  4. Place chicken, breast side up, in a roasting dish.
  5. Using your hands, scoop up some of the sauce and rub all over the chicken.
  6. You can rub some of the sauce under the skin too.
  7. Keep rubbing in the sauce until the chicken is covered.
  8. If there is any sauce left, pour it over the chicken, it will mix with the chicken fat as it roasts and makes a delicious gravy.
  9. Roast, uncovered, for at least 1 hour per kg of chicken.
  10. Remove from the oven and let it sit for 5 minutes before carving.
Notes
  1. Serve with rice or couscous to mop up the gravy.
A Bit of This A Bit of That https://gnatj.com/

Cheese, cheese, everywhere!

Shavuot, a celebration of the day the Jewish people received the Torah. As with all Jewish celebrations, we have special food related to the holiday. For Shavuot that means dairy.

Cheese, cheesecakes, pasta with lots of cheese and cream, ice cream, and most importantly (to me anyway), cheese blintzes. Yummy crepes filled with a sweet cream cheese mix and fried. They can also be made as savoury blintzes.

I found a recipe on Tori Avey’s site and modified it slightly. They were delicious!! Recipe below. All the lovely pictures taken by Paul.

batter
batter


27549224431_726b241ebe_z 

27549233301_9081ee38a0_z 

27522821782_0ce9ef8bae_z 

27012178524_a0a5e4909a_z 

27012181954_42e4dac2d1_z
Fold over the bottom


Fold sides in
Fold sides in 


Keep rolling up and tucking the sides in
Keep rolling up and tucking the sides in 

27622307335_6ef3fc8bd3_z 


Cream Cheese Blintzes
Yields 9
A yummy sweet cream cheese filling wrapped up in a delicious crepe.
Write a review
Print
Prep Time
10 min
Cook Time
30 min
Total Time
40 min
Prep Time
10 min
Cook Time
30 min
Total Time
40 min
Crepes
  1. 4 eggs
  2. 1 cup flour
  3. 1/3 cup sugar (I used cup for cup sugar replacement)
  4. 3/4 cup milk
  5. 1/4 cup water
  6. 1 tsp vanilla
  7. Pinch of salt
  8. Nonstick cooking oil spray
  9. Oil
Filling
  1. 1 package cream cheese
  2. 1/4 cup sugar (I used cup for cup sugar replacement)
  3. 1 egg yolk
  4. 2 tsp fresh lemon juice (I didnt have any and it was fine)
  5. 1 tsp vanilla
  6. Pinch of salt
Crepes
  1. Mix all the crepe ingredients together.
  2. Make sure the batter is smooth and there are no lumps.
  3. Transfer your batter to a jug for easy pouring.
  4. Spray a non stick pan with oil spray.
  5. Pour a small amount of batter (about a third of a cup) into the pan and swirl the pan around to spread the batter.
  6. Leave for a minute or two until the crepe is set, the exposed side of the crepe will feel slightly tacky if you touch it but not completely dry.
  7. Do not flip the crepe.
  8. Set aside on a plate and separate each crepe with wax paper or paper towel.
  9. You should get about 9 thin crepes.
Filling
  1. Mix all the filling ingredients together with a fork.
  2. The mix should be thick-ish and slightly lumpy.
Put together
  1. Lay out one crepe.
  2. Place a tablespoon or so of filling onto the bottom half of the crepe.
  3. Roll the crepe up and over the filling and fold in the sides.
  4. Continue rolling (and folding in the sides) until the crepe is sitting, fold side down on your surface.
  5. Set aside.
  6. Continue this process until all the crepes are rolled.
Final Step
  1. Heat a small amount of oil in the pan.
  2. Place 2 or 3 blintzes, fold side down, in the oil and fry for 30-60 seconds.
  3. Carefully turn the blintzes and fry the other side for 30 seconds.
  4. Remove from oil and drain on paper towel.
  5. Repeat this process with the remaining blintzes.
  6. Keep warm in the oven until ready to serve.
Notes
  1. The original recipe called for ricotta cheese as well as cream cheese. I didn't use ricotta and the filling was fine.
  2. If your batter is too thick you can add a dash more milk or water to thin it out. Your crepes should not be too thick or you wont be able to roll them up.
  3. You can leave out the sugar in the filling and add mushrooms, spinach or any other savoury filling.
  4. These are best served hot but I ate one that had cooled down and it was just as delicious.
Adapted from Tori Avey
A Bit of This A Bit of That https://gnatj.com/

#Zombieprompts Week 14

Share your best soup recipe.

We’ve just seen the end of winter here in the Northern Hemisphere (good riddance!) so no more soup for us. Although chicken soup is always welcome, even in 40°C weather.

chicken-doctor-people-soup-prescription

This winter I made a few ‘throw everything in the pot’ soups and they all actually turned out really well.

In my opinion there are a few basic steps that MUST happen in order for any soup to be good, regardless of the ingredients.

  • Onion. Diced finely and fried until golden. Every soup should start with this as a base.
  • Herbs. Dried or fresh or frozen. You can use whatever you have on hand and don’t be shy, the more the merrier.
  • Time. You cant rush a good soup. Cook your veggies on a lower heat for longer. If you can, make your soup the day before you need it. Soup always tastes better the next day.

So, here is a basic recipe. You can adapt it depending what veggies you have in your fridge.

'Throw Everything In The Pot' Soup
A thick, smooth soup, perfect with fresh bread. The recipe below includes veggies I happen to have in my fridge at the time of writing this.
Write a review
Print
Ingredients
  1. 2 tablespoons olive oil (I use 2 'ice cubes' with chopped herbs from my freezer, very Pinterersty of me)
  2. 1 large onion, diced
  3. Herbs such as rosemary, thyme, cilantro, mixed Italian herbs, basically whatever you have on hand
  4. Garlic, either fresh, chopped or garlic powder
  5. Salt & pepper to taste
The following veggies are not set, use all or some or add what you have
  1. Potatoes, peeled and cubed
  2. Sweet potatoes, peeled and cubed
  3. Carrots, peeled and chopped into chunks
  4. Turnips, peeled and cubed
  5. Leeks, leaves chopped off, cut into 1 cm thick slices
  6. Celery, leaves chopped off, cut into 1 cm thick slices
  7. Water to cover chopped veggies
Instructions
  1. Once you have washed, peeled, diced and chopped all the veggies, add your olive oil and onion to a large pot and saute until golden.
  2. Add remaining veggies to the pot and sprinkle with the herbs, salt and pepper.
  3. Stir the veggies until they are all coated in the oil and spices.
  4. Keep stirring the veggies every 5 minutes or so until they are all heated through and starting to soften.
  5. Add enough water to the pot so that all the veggies are covered. I usually add about 1 cm above the veggie line.
  6. Turn down your heat to a simmer, cover the pot, leaving a small gap to allow steam to escape and simmer for an hour or longer until veggies are soft and falling apart when poked with a fork.
  7. Remove soup from heat and allow to cool slightly.
  8. You can leave the soup at this point and have a chunky broth or you can blend the veggies with a stick blender which is what I do.
  9. Reheat the soup when you are ready to eat.
Notes
  1. You can really add any veggies you want to this soup, peppers, squash, pumpkin, you name it you can add it.
A Bit of This A Bit of That https://gnatj.com/

Whole wheat scones of yumminess!

Over the last few months, Paul’s blood sugar has started acting up. He’s now on a new medication and I’ve renewed my efforts to cook and bake healthier, more diabetic friendly options.

On Saturday we decided to watch a movie with the kids and I wanted to make a snack of some sort that we could all enjoy.

I cant really remember what made me think of scones but I bought some organic whole wheat flour and decided to do a google search.

scone2

The results were divine. The kids went back for 3rds and 4ths and Paul said the scones were excellent.

Sugar free whole wheat scones
Yields 12
Write a review
Print
Prep Time
10 min
Cook Time
15 min
Total Time
25 min
Prep Time
10 min
Cook Time
15 min
Total Time
25 min
Ingredients
  1. 1 cup all-purpose flour
  2. 1 cup whole wheat flour
  3. 3 tablespoons 'spoon for spoon' sugar substitute
  4. 1 1/2 teaspoons baking powder
  5. 1 teaspoon ground cinnamon
  6. 1/4 teaspoon baking soda (I totally forgot to add this and it came out just fine)
  7. 1/4 teaspoon salt
  8. 1/3 cup butter
  9. 2 eggs, slightly beaten
  10. 1/3 cup buttermilk (I didn't have buttermilk so I used a mixture of 1 cup milk with 1 tablespoon vinegar and then used the required amount)
  11. 3/4 cup dried cranberries
  12. Buttermilk for brushing
  13. Rolled oats to sprinkle on top of the dough
Instructions
  1. Preheat oven to 180C.
  2. In a large bowl, stir together all-purpose flour, whole wheat flour, sugar substitute, baking powder, cinnamon, baking soda, and salt.
  3. Using a pastry blender (or your fingers), cut in butter until mixture resembles coarse crumbs.
  4. Make a well in the center of the flour mixture.
  5. In a small bowl, beat egg slightly; stir in the 1/3 cup buttermilk and cranberries.
  6. Add buttermilk mixture all at once to flour mixture.
  7. Stir just until moistened (some of the dough may look dry).
  8. Turn out onto a floured surface.
  9. Knead dough for 10 to 12 strokes or until nearly smooth.
  10. Pat dough to an 8-inch circle about 3/4 inch thick.
  11. Brush top with additional buttermilk; sprinkle with oats, pressing gently into dough.
  12. Cut into 12 wedges. (I used circle and heart shaped cookie cutters, I then took the left over dough and smooched it into 'rounds')
  13. Place dough wedges 1 inch apart on an ungreased or parchment-lined baking sheet.
  14. Bake for 13 to 15 minutes or until edges are light browned.
  15. Serve warm.
Adapted from Diabetic Living
A Bit of This A Bit of That https://gnatj.com/

Cooked as a cucumber.

Last night Paul made a chicken stir fry for dinner. He used carrots, red and green peppers and cucumber.

Stir fry

Cucumber?

At first I couldn’t figure out what it was. I thought it may have been the zucchini I got in the last veggie order but those where yellow and this was green. Eventually Paul told me what it was.

And it was delicious!

I would never, ever have thought about cooking cucumber. To me its a salad veggie. Served sliced and cold. Or a snack with peanut butter to dip it in. Cooking it has never been a thought before.

But it was delicious!

So I Googled and I found a few recipes I want to try out.

Sauteed Cucumber

Baked Cucumber

Roast Cucumber

Do you have any recipes that involve cooking cucumbers? Please leave them in the comments below.

The French know what they are doing.

Part of my last organic veggie order from Maggie’s Garden was about 15 small brown onions. I immediately thought of making a French onion soup.

Part of what intrigued me about this soup is that it is traditionally served with a piece of toasted crusty bread with cheese melted on top. Ummmm, sourdough bread anyone?

image

Yiddisha French Onion Soup
Serves 4
Write a review
Print
Prep Time
10 min
Cook Time
25 min
Total Time
35 min
Prep Time
10 min
Cook Time
25 min
Total Time
35 min
Ingredients
  1. 1 tablespoon oil
  2. 2 tablespoons butter (margarine if you want it to be parve)
  3. 2 cups thinly sliced onions
  4. Salt & pepper to taste
  5. 1 teaspoon thyme (I used oregano since that's what I had)
  6. 1 bay leaf
  7. 1/2 cup dry sherry ( this is where the yiddisha comes in, I used sweet kiddish wine)
  8. 6 cups beef stock (a parve beef stock cube in boiling water if you keep kosher)
  9. Thick slices of crusty bread (hello sourdough!)
  10. Lots of sliced or grated Gruyere or Swiss cheese (here in Israel I used sliced Emek cheese)
Instructions
  1. In a heavy bottomed pot, melt the oil and butter and add the onions.
  2. Season with the salt, pepper and herbs and cook for about 15 minutes storing often.
  3. When the onions have caramalised, add the bay leaf and the sherry/kiddish wine and stir.
  4. Add the stock and bring the soup to a boil.
  5. In the mean time, heat the grill in your oven.
  6. Place the bread slices on a baking sheet and top with slices of cheese.
  7. Place under the grill until the cheese is melted an bubbling.
  8. Dish up the soup into bowls and either float a slice of cheesy bread on top or serve the bread on the side.
Adapted from Rachael Ray via foodnetwork.com
A Bit of This A Bit of That https://gnatj.com/

Left over roast chicken = chicken pie heaven

On Friday I roasted a chicken along with potatoes and sweet potatoes and by the end of the meal we had one breast, a leg and a few potatoes left over. Not enough for leftovers for four people the next day but enough to make a chicken pie which can feed 4-6 people depending on portion size and side dishes.

I put everything in the fridge and last night decided it was time for the pie.

The best part about this recipe is that as long as you have the chicken, you can pretty much add any veggies you like and it will taste delicious. I used up the leftover potatoes by chopping them into cubes and I also threw in half a can of corn. You could also add carrots, peas or any other tinned or frozen veggies you have in the cupboard or freezer or just use whatever leftover veggies you have in the fridge.

pie

Whenever I use the heart cutter to decorate food Faith tells me that the food was ‘made in love’.

Chicken Pie
Great way to use left over roast chicken.
Write a review
Print
Prep Time
15 min
Cook Time
30 min
Total Time
45 min
Prep Time
15 min
Cook Time
30 min
Total Time
45 min
Ingredients
  1. 2 cups chicken shredded (I used a breast and a leg of a roast chicken)
  2. 1 cup veggies (I used a few roast potatoes, roast sweet potatoes and half a cup of tinned corn)
  3. 1 cup water
  4. Garlic powder
  5. Herbs and spices to taste
  6. Salt and pepper to taste
  7. 2 tablespoons margarine, melted
  8. 2 tablespoons flour
  9. 1 sheet puff or shortcrust frozen pastry, thawed to roll
  10. Egg for brushing
Instructions
  1. Heat the oven to 180C.
  2. Place shredded chicken and veggies in a bowl and mix (I dumped them directly into the Pirex pie dish).
  3. In a pan add the garlic, salt, pepper and any spices or herbs you want to the water and bring to the boil.
  4. Melt the margarine and add the flour.
  5. Mix until it forms a gloopy ball.
  6. Once the water is boiling add the flour mixture and stir well to dissolve.
  7. Continue stirring until your sauce has thickened.
  8. Add your sauce to your chicken and veggies and mix to coat everything well.
  9. Roll out your pastry on a floured surface.
  10. Cut out the pastry to fit your pie dish and place gently on top of the chicken.
  11. Brush with beaten egg.
  12. You can add decorative pastry at this point and brush again with the egg.
  13. Poke a few holes or slits into the pastry to allow steam to escape.
  14. Place uncovered in the oven for 30 minutes or until the pastry has browned.
Notes
  1. You can substitute half the water for white wine.
  2. For a thinner sauce just add more liquid.
  3. Serve with rice or couscous.
A Bit of This A Bit of That https://gnatj.com/

A lesson in patience

A few weeks ago Louisa posted that she was making sourdough. I hounded her relentlessly on Twitter about the process and she inspired me to try it myself.

24045645399_2f411f1652_k

I knew it was going to take time, you have to create a starter (a mix of flour and water that creates a natural yeast) and that it would take at least a week for it to be ready. I didn’t realise that actually making the bread would take almost an entire day (PSA: read the recipe from start to finish before you begin), because the yeast is not instant it takes much longer for the dough to proof (rise) than normal bread.

24387226576_4e5831add6_k
Starter

So, yup, not only did I learn how to make sourdough, I got a healthy lesson in patience.

24045767019_b5916e6b26_k

I have to say, the time it took was well worth it. My bread was delicious, especially with a big bowl of homemade chicken soup!

First up: How to make a starter

Sourdough Starter
A natural yeast made from flour and water
Write a review
Print
Ingredients
  1. Flour (rye is suggested as the easiest flour to use, I used regular flour)
  2. Warm water
  3. Glass container with lid
Instructions
  1. Make sure your glass jar and any spoons you use are clean.
  2. Place half a cup flour and half a cup warm water in the glass jar.
  3. Mix gently and close the jar loosely.
  4. Leave for 24 hours.
  5. The next day, pour some of the mixture out and add another half cup flour and half cup water and mix (this is called feeding).
  6. Again, leave the mixture for 24 hours.
  7. The next day your mixture should have bubbles and should start increasing in size.
  8. Continue pouring off a bit and adding flour and water daily.
  9. Your starter should have a pleasant sour smell to it and should look like marshmallow fluff.
  10. It should take roughly a week for your starter to be ready to bake with although it can take longer.
  11. If your starter smells bad or turns green/blue, throw it out and start again.
Notes
  1. I forgot to feed my starter for a few days here and there, the only down side to this is that it took two weeks for it to be ready to use.
  2. Instead of throwing away the starter that you pour off you can pour it into a 2nd (or 3rd) jar and create another starter.
Adapted from Tips for making a starter
A Bit of This A Bit of That https://gnatj.com/
Now for the bread recipe.

23786860383_dac96a45a4_k
Crispy crust, yummy bread

I wanted something really simple to start with and I found a recipe on BBCGoodFood that looked like it fit the bill. I think my recipe still needs some tweaking but it was delish!

Easy Sourdough Bread
Yields 1
Write a review
Print
Total Time
9 hr 40 min
Total Time
9 hr 40 min
Ingredients
  1. 300g sourdough starter
  2. 500g flour of your choice, I used plain white flour
  3. 225ml warm water
  4. 1 teaspoon salt
  5. 1 tablespoon honey (I left this out)
Instructions
  1. Place all ingredients except the salt into a bowl.
  2. Mix with your hands until the dough starts to come together.
  3. Add the salt and continue mixing/kneading the dough.
  4. Add a bit of flour if the dough is too sticky or a bit of water if the dough is too dry.
  5. Knead until the dough is smooth and elastic.
  6. Place in an oiled bowl and cover with cling wrap and a towel, leave in a warm place to rise for about 3 hours or until doubled in size.
  7. Remove from the bowl and knead gently to remove air bubbles.
  8. Gently flour the dough and place it seam side up in a medium sized bowl or proofing bowl to keep it shape.
  9. Cover in cling wrap and a towel again and leave in a warm space to rise for about 6 hours.
  10. Heat your oven to 200C and place a baking tray inside to warm up.
  11. Place a pan with water at the bottom to create steam, this helps form a crispy crust.
  12. Once the tray is heated, lightly dust the tray with flour and gently tip your bread onto the tray.
  13. You can cut lines into the top of the dough at this point.
  14. Bake for 40 minutes.
  15. You can open the oven door 5 - 10 minutes before its done to let the steam escape, prop the door open with a wooden spoon (I forgot this step and my crust burned a bit).
Adapted from BBCGoodFood
A Bit of This A Bit of That https://gnatj.com/
All photos by Paul

Traditional

After an awesome day spent with my husband for his #Big40, and eating almost non stop, Paul picked up a pack of chicken schnitzel for supper last night. Which fits in perfectly with the ‘Fry All The Things’ chanukah meal plan.

I love a fresh, home made, schnitzel and its one of the things I never would have made myself before coming to Israel, here it is pretty much one of the most traditional things you can eat. My kids love it too and its one of our favourite meals, even if it takes a bit of time to prepare.

Chicken Schnitzel
Crispy, golden, crumbed chicken breasts
Write a review
Print
Prep Time
10 min
Cook Time
15 min
Prep Time
10 min
Cook Time
15 min
Ingredients
  1. 4 double chicken schnitzel breasts (you can get them ready prepared from the butcher or buy chicken breasts and flatten them into schnitzel yourself)
  2. Flour
  3. 2 eggs, beaten
  4. Bread crumbs (or matza meal)
  5. Seasoning to taste
  6. Oil for frying
Set up a work station on your counter near your stove with the following
  1. One plate with half a cup of flour (this plate should be furthest from our stove).
  2. A flat dish/bowl with the beaten egg.
  3. Another plate with bread crumbs, seasoned to taste (this plate should be closest to your stove).
Next
  1. Heat the oil in a large pan.
  2. Coat a chicken piece in flour on both sides.
  3. Dip the chicken in the beaten egg, making sure all the flour is covered by egg on both sides.
  4. Now coat the egg covered chicken on both sides in the bread crumbs.
  5. Carefully place the chicken in the hot oil and fry for about 5-7 minutes (the thinner the schnitzel the shorter the frying time).
  6. Turn the chicken over and fry the other side until golden.
  7. Place fried chicken on paper towel to absorb excess oil and then keep warm in the oven.
  8. Repeat the process with the remaining chicken, topping up your flour/eggs/bread crumbs as needed.
Notes
  1. Serve with salad or rice.
A Bit of This A Bit of That https://gnatj.com/