Black Lentil and Chickpea Stew

We have decided its time to start eating less meat and chicken and try out more veggie dishes. Not only is it healthier but its cheaper too.

This was my first real veggie dish with lentils and it turned out so well. Aaron even went back for seconds when I thought I would have had to bribe him to even try it.

Black Lentil and Chickpea Stew
Prep Time
15 mins
Cook Time
40 mins
 
Course: Main Course
Cuisine: Mediterranean
Keyword: Vegan, Vegetarian
Servings: 4
Author: Gina
Ingredients
  • olive oil
  • 1 medium onion roughly chopped
  • 2 teaspoons cinnamon
  • 2 teaspoons ras al hanut spice
  • 2 teaspoons sweet chili flakes
  • garlic crushed, as much as you like
  • 2 cups vegetable stock
  • 2 cups water
  • 1 can diced or crushed tomatoes
  • 2 medium carrots peeled and sliced into thin rounds
  • 1 cup black lentils uncooked, soaked
  • 1 tin ready to eat chickpeas
Instructions
  1. Heat oil in the pot

  2. Add onions, garlic and spices, stir until everything is mixed and the onions are soft

  3. Add stock, water, tomatoes, carrots and lentils

  4. Bring to the boil and then lower heat and simmer, uncovered for about 25 minutes

  5. Add chickpeas and simmer for a further 10 minutes

Recipe Notes

Serve over rice or with naan

I adapted this recipe from vanillaandbean.com

Yes, another recipe.

A while back I bought sour cream and since it was on special I bought 5 pots. Then I only used one. 

Since the sour cream was about to reach its expiry date (can sour cream really expire? Does it just get more sour?) I asked around for recipes to use up the last 4 pots.

I used one pot to make a creamy nutmeg pasta sauce the other night and then last night I used another pot to make these quick and really delicious scones.

Scones my wife made


Sour Cream Scones
Prep Time
5 mins
Cook Time
15 mins
Total Time
20 mins
 
Course: Breakfast, Side Dish, Snack
Servings: 6
Author: Gina
Ingredients
  • 2 cups flour
  • 1/2 teaspoon salt
  • 1 envelope baking powder (about 3 teaspoons)
  • 200 ml sour cream
  • 6 tablespoons water approx/as needed
Instructions
  1. Preheat oven to 200C.

  2. Mix together all the dry ingredients.

  3. Add the sour cream and start mixing it in.

  4. The mixture will start to look like bread crumbs.

  5. Add water, a tablespoon at a time, until the dough starts to come together.

  6. Use your hands to kneed the dough into a ball. The dough will be quite sticky.

  7. Coating your hands in flour, take small handfuls of the dough and form balls.

  8. Place on a baking tray and flatten slightly.

  9. Bake at 200C for about 15 minutes.

  10. Allow to cool slightly before breaking them open and slathering butter, jam and cream over them.

Recipe Notes

Adapted from AllRecipes here.

Have your (cheese)cake and eat it too!

Once again, Shavuot has come and gone.

Last year I blogged about the awesome cheese blintzes I made (which I made again this year).

This time I decided to try my hand at making a cheesecake. I also wanted to make it sugar free so that Paul could enjoy it too. 

I found a few recipes online and using them as a base, I adjusted to the ingredients I had available.

Sugar Free Cheesecake
Prep Time
10 mins
Cook Time
50 mins
Total Time
1 hr
 

A fluffy, sugar free, baked cheesecake.

Course: Dessert
Author: Gina
Ingredients
Base
  • 1 packet sugar free chocolate tea biscuits
  • 1/3 cup butter
  • 3 tbsp cup for cup sugar replacement
  • 1 tbs vanilla
Filling
  • 750 g ricotta cheese
  • 200 ml sour cream
  • 1 1/4 cups cup for cup sugar replacement
  • 3 large eggs
  • 1 tbsp lemon juice
  • 1 tsp vanilla
Instructions
Base
  1. Crush the biscuits until they resemble fine crumbs.

  2. Melt the butter and mix into the biscuit crumbs along with the sugar replacement and vanilla.

  3. Press the mixture into a prepared round 9 inch springform cake pan (or into the bottom of a glass or pyrex dish.

  4. Bake at 160C for about 5 minutes.

  5. Allow to cool while assembling the filling.

Filling
  1. Beat the ricotta, sour cream and sugar replacement until smooth.

  2. Add the eggs one at a time and beat to incorporate.

  3. Add the lemon juice and vanilla and mix well.

  4. Once your base is cool, slowly pour the filling on top and smooth out the top.

  5. Bake in a 160C oven for 50 minutes. The top will begin to turn brown and crack around 45 minutes. This is normal.

  6. Run a knife around the edge of the cake and then allow the cake to cool to room temperature before transferring to the fridge for at least 2 hours.

  7. Once the cake is chilled you can remove it from the pan.

Its not just banana bread

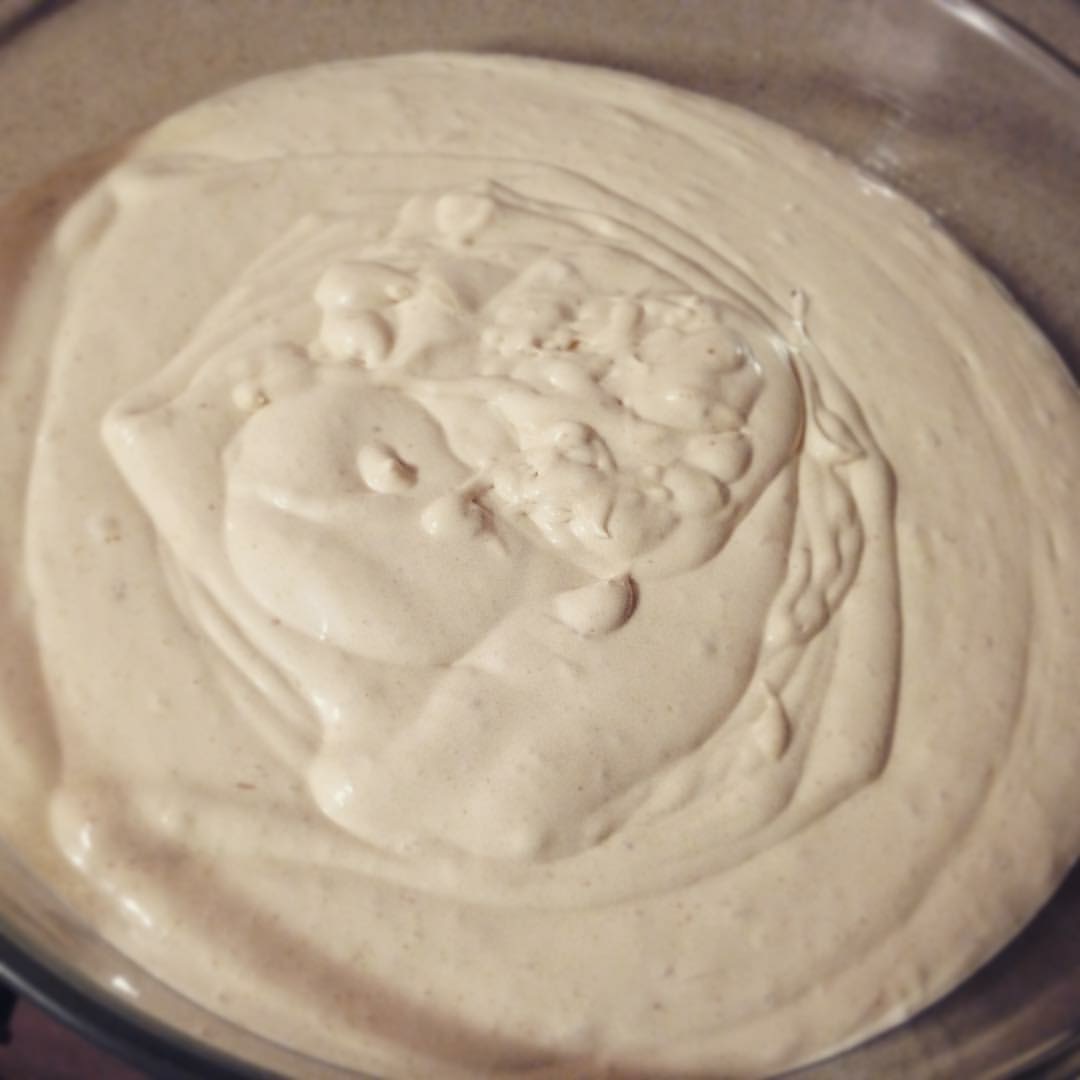
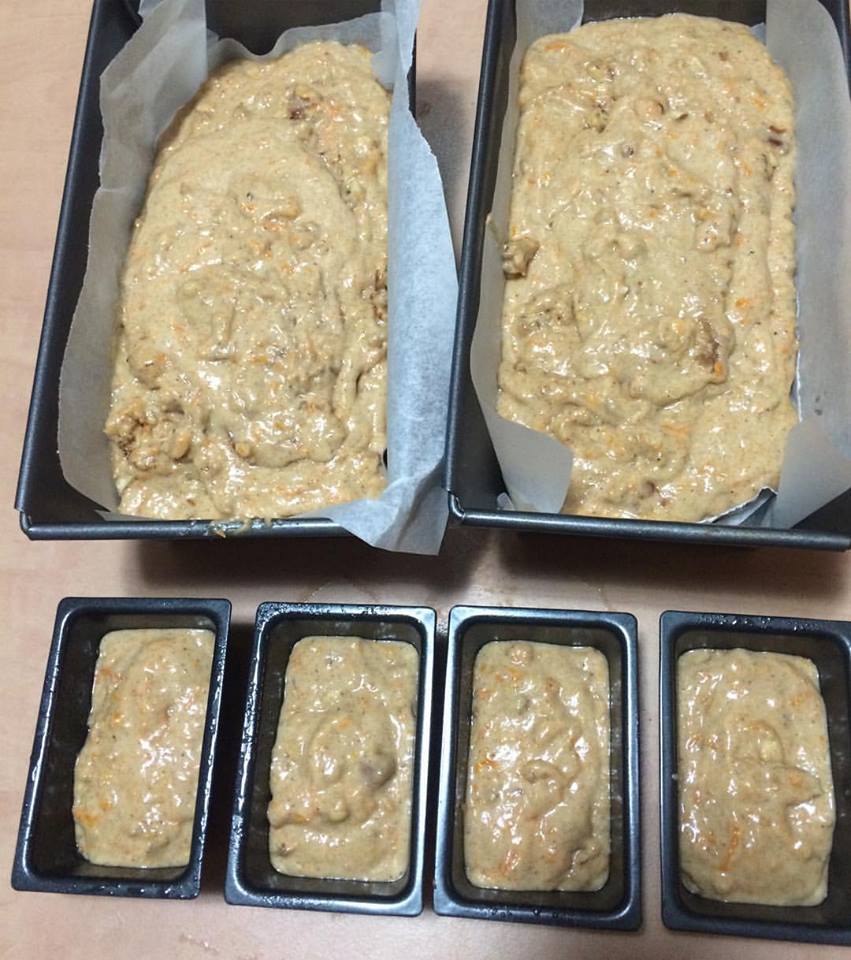
So I mentioned that I bought a stand mixer the other day. Well, it arrived and so far I have made 2 batches of challah using the dough hook (NEVER kneading dough again!) as well as a batch of cinnamon muffins and on Friday I made an apple and banana bread/muffin recipe.

I have absolutely no idea what prompted me to add apples into the mix but I’m glad I did. They were amazing!

Apple Banana Bread
Yummy fresh apple and banana bread.
Write a review
Print
Prep Time
15 min
Cook Time
45 min
Total Time
1 hr
Prep Time
15 min
Cook Time
45 min
Total Time
1 hr
Ingredients
  1. 3 large grated or finely chopped apples (I used 2 green and 1 red and left the skin on)
  2. 3 large ripe or overripe bananas, mashed
  3. 2 cups sugar (I used sugar replacement)
  4. 3 cups flour
  5. 1 teaspoon baking soda
  6. 1 tablespoon cinnamon
  7. 2 large eggs
  8. 2/3 cup of oil
  9. 2 teaspoons vanilla (I didn't have so didn't add and it was absolutely fine)
Instructions
  1. Preheat your oven to 180C and grease 2 loaf pans or like I did, 1 loaf pan and 2-3 muffin trays (12-18 muffins).
  2. Add all the ingredients into a large bowl or the bowl of your stand mixer.
  3. Mix well, ensuring all the flour is incorporated.
  4. Separate batter into the desired pans and place in the oven.
  5. For loafs, bake for about 1 hour.
  6. For muffins bake for between 30 minutes and 45 minutes.
Notes
  1. The original recipe called for half a cup chopped nuts and half a cup raisins. I had neither on hand so didn't add them and the recipe came out fine. You could also add craisins or even chocolate chips to this recipe and it would be delicious.
Adapted from Food.com
A Bit of This A Bit of That https://gnatj.com/

Things I have recently learned…

Boys are gross

OK, so not something I didn’t already know but still. 

I could not look at Aaron’s room for a single minute more on Friday. So I asked demanded that he clean everything. I made him pick up and throw away every last piece of paper, string, broken toy, piece of crap off his floor. He had to clean out his toy box, bedside table and computer desk. He had to dust everything, wipe down all the surfaces and then sweep the floor. I then came in and used my awesome steam mop thingy to clean the floors. The best part was when I told him I want the floor clean enough to eat off. His eyes almost bugged out until I told him that it was a saying and we were not really going to eat off the floor.

So now his room is pretty clean, except for the cardboard boxes he is turning into a plane. Lets see how long it lasts this time.

Winter – Pic taken by Paul

The vacuum cleaner wasn’t broken

About 2 years ago we bought a really cheap vacuum cleaner from the local grocery store. It was cheap but it worked really well. For the last little while I’ve noticed that it wasnt working as well as it used to. We cleaned it out. Paul pulled out a fair bit of fluff and hairballs and it worked a bit better but no where near as well as when it was new. I thought that was that. Its a cheap machine, obviously has a short lifespan. I asked Paul to give it a clean so I could use it on the above mentioned boy’s room. Paul landed up taking the thing apart and actually washing one of the big sponge filters, which was disgustingly dirty. 

Let me just say, the machine now works like I just took it out the box. It even picked up glitter off the tiles and carpet. 

Moral of the story? Clean and service your appliances before throwing them out. 

Jerusalem – pic taken by Paul

You can make cake using plain Greek yogurt and no sugar

I felt like making a cake for tea yesterday and I didnt have any diabetic cup for cup sugar replacement available. What I did have was stevia liquid. I searched online and found a simple trick for using liquid stevia as a replacement in a regular recipe.  Basically 1 teaspoon stevia for each cup of sugar as well as 1/3 cup liquid for each cup of sugar. In my case I used plain yogurt.

The cake came out delicious!

Greek Yogurt Lemon Cake
A dense and yummy lemon cake with no sugar.
Write a review
Print
Prep Time
10 min
Cook Time
45 min
Total Time
55 min
Prep Time
10 min
Cook Time
45 min
Total Time
55 min
Ingredients
  1. 2 3/4 cups flour
  2. 1 1/2 teaspoons baking powder
  3. 1 teaspoon baking soda
  4. 1 teaspoon salt
  5. 1 tablespoon butter (you can use the equivalent in oil)
  6. 3 eggs
  7. 1 tablespoon vanilla extract
  8. 2 teaspoons stevia liquid
  9. 1 1/2 cups plain Greek yogurt
  10. 1/2 cup lemon juice (you can also add a bit of lemon rind if you used a fresh lemon but its not necessary)
Instructions
  1. Preheat the oven to 180C
  2. In 1 bowl mix the flour, baking powder, baking soda and salt.
  3. In a 2nd bowl mix the butter/oil, eggs, vanilla, stevia, yogurt and lemon juice.
  4. Slowly add the dry bowl into the liquids bowl, mixing well as you add them together.
  5. Mix well until there are no lumps.
  6. Pour the batter into a prepared tin and bake for about 45 minutes.
Notes
  1. We ate this cake straight from the oven. It was totally delicious.
A Bit of This A Bit of That https://gnatj.com/

Scottish oatcakes of yumminess!

As you know, Paul is diabetic, and I am always trying to find yummy sugar free food to bake or cook for him.

Paul tends to eat a bowl of oats with fresh fruit in the mornings but its getting boring. I work with a lot of UK products and last week, Scottish oatcakes kept popping up. So I googled and found a variety of recipes and yesterday I tried out a simple Scottish oatcake recipe.

These biscuits can be used in place of bread. Spread some butter, honey, jam or cheese on top or just have them plain right out the oven!

Scottish Oatcakes
Yields 16
A quick to make, yummy biscuit. Can be served with butter, cheese, jam or as is.
Write a review
Print
Prep Time
5 min
Cook Time
20 min
Total Time
25 min
Prep Time
5 min
Cook Time
20 min
Total Time
25 min
Ingredients
  1. 250g oats, whizzed in the blender until they become a flour consistency
  2. 25g butter, melted (I used margarine so they are dairy free, you could also use oil)
  3. 1/2 teaspoon bicarb of soda
  4. pinch of salt
  5. 150ml hot (not boiling) water
Instructions
  1. Preheat your oven to 180C.
  2. Set aside a bit of the oatmeal flour for later.
  3. Mix all the ingredients together until you have a rough dough ball.
  4. If its too sticky add some more oats, if its too dry add a dash of water.
  5. Dust your surface with the oatmeal flour you set aside earlier.
  6. Roll out the dough about 2-3mm thick.
  7. Take a clean glass and cut out rounds.
  8. You can re-roll the scraps until there is nothing left.
  9. Place rounds on a baking sheet and bake for 20 minutes.
Notes
  1. These were delicious fresh out the oven with a bit of butter.
  2. If you are not using them right away you can warm them up in the oven for a few minutes before serving although they are just as delicious cold.
  3. Store them in an airtight container.
Adapted from Penny's Recipes
A Bit of This A Bit of That https://gnatj.com/

Peanut butter ice cream

I usually make ice cream in my churner but that requires some forethought and planning and since this was a last minute decision I went will a ‘no cook’ ice cream. 

image

Basic ice cream recipe with peanut butter
A simple 'no cook, no churn' dairy free ice cream
Write a review
Print
Prep Time
15 min
Cook Time
2 hr
Total Time
2 hr 15 min
Prep Time
15 min
Cook Time
2 hr
Total Time
2 hr 15 min
Ingredients
  1. 1 box dairy free cream
  2. 4 eggs separated
  3. Half cup caster sugar (I use sugar replacement to make it diabetic friendly)
  4. Splash of vanilla
  5. Any addition you like I.e.
  6. Peanut butter
  7. Crushed biscuits
  8. Fruit
  9. Chocolate
Instructions
  1. Whip egg whites until soft peaks form.
  2. Slowly add in sugar and blend gently.
  3. Add egg yolks and vanilla.
  4. In a separate bowl beat cream until about double in size.
  5. Combine both bowls together.
  6. Gently fold in your addition. I used about 3 tablespoons of sugar free smooth peanutbutter.
  7. Place in freezer proof dish, cover well and freeze for at least 2 hours.
A Bit of This A Bit of That https://gnatj.com/

Pumpkin!

My mommy in law sent me a recipe for pumpkin bread and last night I finally managed to make it.

The original recipe called for 3 cups of sugar and white flour. Since Paul is diabetic I switched things around a bit so he could also enjoy it.

When I started writing up this post I realised that I had only taken a quick picture of the breads before going into the oven.

bread

The loaf I brought to work went so quickly I didn’t have a chance to take a picture either. So I asked Paul to take a quick picture and send it to me.

Why I was surprised when he didn’t just send a quick cell phone pic is beyond me. I know better.

What follows is the gorgeous styled photo shoot he did.

Baked pumpkin bread 

Baked pumpkin bread 

Baked pumpkin bread 

Baked pumpkin bread 

Baked pumpkin bread 

And now for the recipe.

Pumpkin Bread
Yields 2
Yummy, sweet pumpkin bread
Write a review
Print
Prep Time
10 min
Cook Time
1 hr
Total Time
1 hr 10 min
Prep Time
10 min
Cook Time
1 hr
Total Time
1 hr 10 min
Ingredients
  1. 2 cups cooked, mashed pumpkin
  2. 2 cups sugar replacement (original recipe calls for 3 cups sugar)
  3. 1 cup oil
  4. 4 eggs
  5. 2/3 cup water
  6. 1 and 1/3 cup white flour
  7. 2 cups wholewheat flour (original recipe was all white flour)
  8. 1 and 1/2 teaspoons salt
  9. 1 teaspoon nutmeg (I didn't have so I left it out)
  10. 1 teaspoon cinnamon (I didn't actually measure, I just poured a whole lot in)
  11. 2 teaspoons baking soda
  12. 1 cup chopped nuts (I used almonds since that's what I had on hand)
Instructions
  1. Heat your oven to 180C.
  2. Prepare 2 bread tins.
  3. Cook your pumpkin and then drain and mash it.
  4. Add all the ingredients to a large mixing bowl and mix until well combined.
  5. Split the mixture between the 2 tins.
  6. I kept a little back and used my 4 teeny tiny little miniature bread tins, just for fun.
  7. Bake for between 45 minutes to an hour. I stuck with Hilary's suggestion of an hour (I put the mini tins in for the last 20 minutes).
Notes
  1. Enjoy hot out the oven with melted butter.
  2. Its equally as good, cold the next day.
A Bit of This A Bit of That https://gnatj.com/

Dreamy Zucchini

I’ve been ordering organic veggie boxes every two weeks from Maggie’s Garden for a few months now. 

One of the things I love about the boxes is that I get to try out veggies that I wouldn’t normally buy. Like kohlrabi and zucchini. 

I’ve received zucchini a few times now and every time I’ve grilled or fried them and then thought to myself, ‘That was nice but why didn’t I make zucchini bread?’

So this time I specifically ordered a kilo of zucchini so I could make bread. I searched for a sugar free recipe so that Paul could eat it too and what I came up with was delicious!

zucc

Diabetic friendly zucchini bread
sugar free, whole wheat zucchini bread
Write a review
Print
Prep Time
10 min
Cook Time
40 min
Total Time
50 min
Prep Time
10 min
Cook Time
40 min
Total Time
50 min
Ingredients
  1. 3 eggs
  2. 1 1/4 cup canola oil
  3. 1 1/2 cup 'spoon for spoon' sweetener
  4. 1/4 cup water
  5. 1 tsp vanilla
  6. 2 cup grated unpeeled raw zucchini
  7. 2 cup whole wheat flour
  8. 2 tsp baking soda
  9. 1 tsp baking powder
  10. 1 tsp salt
  11. 1 tsp cinnamon
  12. 1 cup chopped walnuts
Instructions
  1. Preheat oven to 180C.
  2. Beat eggs, oil, sweetener, water and vanilla until light and thick.
  3. Fold zucchini, then dry ingredients, into wet batter until just blended; add nuts.
  4. Pour into greased pan(s).
  5. Bake for 45 minutes.
  6. Let cool for 10 minutes before slicing.
Notes
  1. This was really yummy served warm with melted butter. It was equally yummy served cold.
Adapted from Just a Pinch
A Bit of This A Bit of That https://gnatj.com/

No knead wholewheat artisanal bread

The #BestBossEver sent me a link on Facebook to this recipe and I knew I had to try it for Shabbat tonight. 

Although the actual preparation takes all of 5 minutes, you do need to prepare your dough a minimum of 8 hours before you want to bake it. 

So I made my dough last night before I went to bed. It literally took 5 minutes. This afternoon I baked it, which took about 20 minutes to heat the oven and let the dough rest after shaping and a further 45 minutes to bake. 

image

Here’s the recipe. 

No knead wholewheat artisanal bread
Easy peasy bread
Write a review
Print
Prep Time
5 min
Cook Time
45 min
Prep Time
5 min
Cook Time
45 min
Ingredients
  1. 1 cup white flour
  2. 2 cups wholewheat flour
  3. 1 teaspoon salt
  4. 1/2 teaspoon yeast
  5. 1 and 1/2 cups warm water
Instructions
  1. In a medium bowl mix all ingredients together with a wooden spoon.
  2. Mixture will be shaggy looking.
  3. Cover the bowl with plastic wrap not too tightly (I then covered the bowl with a towel).
  4. Leave at room temperature for a minimum of 8 hours but up to 24 hours.
  5. The dough will have doubled in size and look bubbly.
  6. Turn oven to 180C and place a high sided dish into the oven to get warm.
  7. Turn the dough onto a floured surface and shape into a round.
  8. Set aside until the oven is ready.
  9. Once ready, cut an 'x' into the bread and gently transfer to the hot dish.
  10. Do NOT burn yourself!
  11. Cover the dish with foil and bake for 30 minutes covered.
  12. Uncover the dish and bake for a further 15 minutes.
  13. Let cool before slicing.
Adapted from It's Always Autumn
A Bit of This A Bit of That https://gnatj.com/